
Step 1.
Choose your yarn. Use animal fibers (wool, silk, alpaca etc..), I used 8ply Merino. Kool Aid will not dye cotton or synthetic fibres. You can also use machine washable yarns, these will not effect the dye uptake and, as a bonus, will not felt! Wind your yarn into a long skein ready for dyeing.
Step 2.
Soak the yarn for at least a few hours in room temperature water (just use tap water).
 Note: I soaked my yarn overnight and I also added around 50mls of vinegar to the water. This, however is not necessary as the Kool Aid is very acidic, so its up to you to add vinegar or not.
Step 3.
Prepare the dye. Dissolve one packet of Kool Aid in 250mls of warm tap water, this will give a saturated colour. If you want a lighter colour add more water, for really intense colours add less water. Its an idea to use gloves, unless you want multicoloured hands, and cover your benches with plastic as Kool Aid will stain surfaces if spilt.
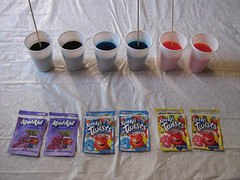 Note: The Kool Aid colors are interchangeable and you can mix different colours together. Click on links for a comprehensive colour chart and colour card of Kool Aid dyed yarn.
Step 4.
The fun begins! Use a 50ml syringe (available from chemists) or a baster (available from kitchen wear shops) and squirt the dye in sections onto the fibre. Push the dye into the yarn and don't forget to turn the yarn over and dye that side as well. Check each section to make sure the dye has fully penetrated into the fiber (redo if necessary). You can use a sponge to mop up excess water once the dye has been absorbed (this happens very quickly).
Remember if you dye a long section of yarn with one colour this will, when knitted, show up as a large block of colour. So if your after short repeats of colour, dye small areas and if your after large blocks of colour, dye long sections.
Long repeat
 Short Repeat
Have fun and experiment with different colour combinations, just be aware that the dyes do run into each other and some color mixing will occur (unless you leave undyed spaces between colours). This makes for an interesting effect, but can sometimes be a bit of a disaster eg purple and yellow makes brown- unless thats what your after.
Step 5.
Now your colours need to be heat set. To do this you can put the skein into a microwaveable dish covered with cling wrap and cook for 2 minutes, then leave it to cool before removing the cling wrap. For the stove top, put the skein carefully into a steamer basket (I used an old colander) and put over boiling water. Cover and steam the skein for about 30 minutes. Once this is done leave the yarn to cool and then carefully rinse, watching that the yarn doesn't start to felt. Hang the yarn out to dry.
Note: Try to keep each colour section separate whilst steaming as the dye can run off one section and onto another, causing an over dye effect.

 Once the skein is dry, re-skein the yarn and thats it! Its fun and simple. Here are some photos of my skeins...


