
Thursday, December 11, 2008
Italy
This is going to be a very special Christmas/New Year cos I'm off to Italy!!! I cant wait to be swept away by Italian art and culture, reviving myself with a heart starting Macchiato and sampling regional delights of food and vino. For my travel knitting Ive decided to take my Globe Trotter Socks by Jodie Danenberg, of which I have only one sock left to complete, as well as some Noro Kureyon Sock yarn to start another pair of "Stripes" Socks (this time for myself). My bag isnt complete without a sketch pad and some water colours and of course the camera. So Merry Christmas and Happy New Year, see you in a month! Arrivederci
Sunday, November 16, 2008
Stripes
Yarn: Noro Kureyon Sock (Colourway S164)
Needle Size: 2.75mm Circular Needles (Magic Loop)
Needle Size: 2.75mm Circular Needles (Magic Loop)


I really enjoyed knitting these socks, the pattern was easy to follow which was a plus since these are my first ever socks. I am now addicted to knitting socks and sock yarn (didn't take me long to become hooked) and have already cast on my second pair. The yarn did stripe beautifully and the colours, as always with Noro yarns, are exquisite, however the yarn did have a tendency to knot so I was frequently trying to untangle as I knit. But all in all I'm very happy with the end results.
Tuesday, November 11, 2008
Green

2. Pistachio Green Owl and Pussycat- Originlal Art Print by Sugarloop
3. KPPPM Yarn- Available from South Seas Knitting
4. Handbound Notebook-Green Leaves by Paper Lion
5. Christmas Stars- crochet Christmas decorations by Kylie B
6. Knitting Needle Bracelet by Liana Kabel
7. Organic Leaf Brass Necklace by Secret Jewellz
8.Unraveling- Original Giclee art print by Mizu Designs
9. Waiting by Pietari Post-100% linen tea towel- Available from Third Draw Down
10. Pebbles Fabric by Park Slope- Available from Duck Cloth
And finally..how georgeous are these gift tags!
 Berry Jam for Tea Gift Tags by Mulberry Muse
Monday, November 10, 2008
Malabrigo Worsted
I've just received in the mail my order of Malabrigo Worsted Yipeeee. I LOVE the colour and am so glad I picked this colourway (Stonechat).
 I've decided to knit the "Wicked" worsted weight sweater from Zephyr Style, cant wait to cast on!
 I also ordered a skein of Cascade 220, a beautiful heathered chocolate brown, which I'm planning to turn into the "Star Crossed Slouchy Beret" by Natalie Larson (which is free on ravelry).
 I've decided to knit the "Wicked" worsted weight sweater from Zephyr Style, cant wait to cast on!
 I also ordered a skein of Cascade 220, a beautiful heathered chocolate brown, which I'm planning to turn into the "Star Crossed Slouchy Beret" by Natalie Larson (which is free on ravelry).
Thursday, October 30, 2008
Kimono Glass Case
Kimono Fabric Glass Case
Pattern: My Own
Material: 100% cotton, vintage Kimono, 100% Cotton lining, crepe fabric covered button, elastic
Pattern: My Own
Material: 100% cotton, vintage Kimono, 100% Cotton lining, crepe fabric covered button, elastic


Monday, October 13, 2008
I Heart Japan
This next project is a Zakka Pouch made as a surprise for a fellow raveler! I love anything Japanese!
Zakka Pouch
Pattern By: Black Dog Designs
Material: Peaches and Cream - 10 ply/ Worsted Cotton; Imported Japanese Zakka Fabric- 100% cotton
Needle Size: 5mm


And finally a Vintage Kimono Pouch......


Pattern By: Black Dog Designs
Material: Peaches and Cream - 10 ply/ Worsted Cotton; Imported Japanese Zakka Fabric- 100% cotton
Needle Size: 5mm


And finally a Vintage Kimono Pouch......
Kimono Pouch
Material: Vintage Kimono Fabric with Gingham Lining 100% Cotton
Material: Vintage Kimono Fabric with Gingham Lining 100% Cotton


Busy
I have finished so many projects in the last week. The first two are Christmas presents for my brother and his wife (a scarf each), both were knitted from Noro yarn. I have never used this yarn before and I LOVE it. The colours are beautiful and so is the feel of the yarn.


This next project was made for "The Great Knitted Purse Swap" on Ravelry. It was sent across the great ocean to live in America with Susan. The Original pattern suggests embroidery flowers on the outside of the bag, but I wanted something different, so I went with buttons.
Daphne Purse
Pattern: Louisa Harding
Material: Peaches and Cream- 10 ply/ Worsted Cotton
Needle Size: 4.5mm and 5.5mm


Garter Stitch Scarf
Material: Noro Iro- 12 ply/ Bulky, Wool, Silk
Needle Size: 8mm
Inspiration: Brooklyn Tweed
Needle Size: 8mm
Inspiration: Brooklyn Tweed


Noro Striped Scarf
Pattern: Jared Flood
Material: 4 Skeins Noro Silk Garden- 10 ply/Aran. Silk, Mohair, Wool
Needle Size: 4.5mm
Pattern: Jared Flood
Material: 4 Skeins Noro Silk Garden- 10 ply/Aran. Silk, Mohair, Wool
Needle Size: 4.5mm


This next project was made for "The Great Knitted Purse Swap" on Ravelry. It was sent across the great ocean to live in America with Susan. The Original pattern suggests embroidery flowers on the outside of the bag, but I wanted something different, so I went with buttons.
Pattern: Louisa Harding
Material: Peaches and Cream- 10 ply/ Worsted Cotton
Needle Size: 4.5mm and 5.5mm


Wednesday, September 3, 2008
Handpainted Kool Aid Yarn Tutorial
Hi, this is my first post and I thought I would do a quick tutorial on Kool Aid dyeing. I had so much fun doing this and I was really happy with the way the yarns turned out. So here we go...
Step 1.
Choose your yarn. Use animal fibers (wool, silk, alpaca etc..), I used 8ply Merino. Kool Aid will not dye cotton or synthetic fibres. You can also use machine washable yarns, these will not effect the dye uptake and, as a bonus, will not felt! Wind your yarn into a long skein ready for dyeing.
Step 2.
Soak the yarn for at least a few hours in room temperature water (just use tap water).
 Note: I soaked my yarn overnight and I also added around 50mls of vinegar to the water. This, however is not necessary as the Kool Aid is very acidic, so its up to you to add vinegar or not.
Step 3.
Prepare the dye. Dissolve one packet of Kool Aid in 250mls of warm tap water, this will give a saturated colour. If you want a lighter colour add more water, for really intense colours add less water. Its an idea to use gloves, unless you want multicoloured hands, and cover your benches with plastic as Kool Aid will stain surfaces if spilt.
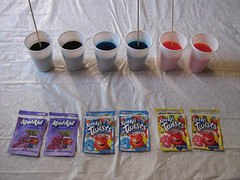 Note: The Kool Aid colors are interchangeable and you can mix different colours together. Click on links for a comprehensive colour chart and colour card of Kool Aid dyed yarn.
Step 4.
The fun begins! Use a 50ml syringe (available from chemists) or a baster (available from kitchen wear shops) and squirt the dye in sections onto the fibre. Push the dye into the yarn and don't forget to turn the yarn over and dye that side as well. Check each section to make sure the dye has fully penetrated into the fiber (redo if necessary). You can use a sponge to mop up excess water once the dye has been absorbed (this happens very quickly).
Remember if you dye a long section of yarn with one colour this will, when knitted, show up as a large block of colour. So if your after short repeats of colour, dye small areas and if your after large blocks of colour, dye long sections.
Long repeat
 Short Repeat

Have fun and experiment with different colour combinations, just be aware that the dyes do run into each other and some color mixing will occur (unless you leave undyed spaces between colours). This makes for an interesting effect, but can sometimes be a bit of a disaster eg purple and yellow makes brown- unless thats what your after.
Step 5.
Now your colours need to be heat set. To do this you can put the skein into a microwaveable dish covered with cling wrap and cook for 2 minutes, then leave it to cool before removing the cling wrap. For the stove top, put the skein carefully into a steamer basket (I used an old colander) and put over boiling water. Cover and steam the skein for about 30 minutes. Once this is done leave the yarn to cool and then carefully rinse, watching that the yarn doesn't start to felt. Hang the yarn out to dry.
Note: Try to keep each colour section separate whilst steaming as the dye can run off one section and onto another, causing an over dye effect.

 Once the skein is dry, re-skein the yarn and thats it! Its fun and simple. Here are some photos of my skeins...


Step 1.
Choose your yarn. Use animal fibers (wool, silk, alpaca etc..), I used 8ply Merino. Kool Aid will not dye cotton or synthetic fibres. You can also use machine washable yarns, these will not effect the dye uptake and, as a bonus, will not felt! Wind your yarn into a long skein ready for dyeing.
Step 2.
Soak the yarn for at least a few hours in room temperature water (just use tap water).
Note: I soaked my yarn overnight and I also added around 50mls of vinegar to the water. This, however is not necessary as the Kool Aid is very acidic, so its up to you to add vinegar or not.Step 3.
Prepare the dye. Dissolve one packet of Kool Aid in 250mls of warm tap water, this will give a saturated colour. If you want a lighter colour add more water, for really intense colours add less water. Its an idea to use gloves, unless you want multicoloured hands, and cover your benches with plastic as Kool Aid will stain surfaces if spilt.
Note: The Kool Aid colors are interchangeable and you can mix different colours together. Click on links for a comprehensive colour chart and colour card of Kool Aid dyed yarn.Step 4.
The fun begins! Use a 50ml syringe (available from chemists) or a baster (available from kitchen wear shops) and squirt the dye in sections onto the fibre. Push the dye into the yarn and don't forget to turn the yarn over and dye that side as well. Check each section to make sure the dye has fully penetrated into the fiber (redo if necessary). You can use a sponge to mop up excess water once the dye has been absorbed (this happens very quickly).
Remember if you dye a long section of yarn with one colour this will, when knitted, show up as a large block of colour. So if your after short repeats of colour, dye small areas and if your after large blocks of colour, dye long sections.
Long repeat
Short RepeatHave fun and experiment with different colour combinations, just be aware that the dyes do run into each other and some color mixing will occur (unless you leave undyed spaces between colours). This makes for an interesting effect, but can sometimes be a bit of a disaster eg purple and yellow makes brown- unless thats what your after.
Step 5.
Now your colours need to be heat set. To do this you can put the skein into a microwaveable dish covered with cling wrap and cook for 2 minutes, then leave it to cool before removing the cling wrap. For the stove top, put the skein carefully into a steamer basket (I used an old colander) and put over boiling water. Cover and steam the skein for about 30 minutes. Once this is done leave the yarn to cool and then carefully rinse, watching that the yarn doesn't start to felt. Hang the yarn out to dry.
Note: Try to keep each colour section separate whilst steaming as the dye can run off one section and onto another, causing an over dye effect.
Once the skein is dry, re-skein the yarn and thats it! Its fun and simple. Here are some photos of my skeins...
Subscribe to:
Posts (Atom)


